Small Arcade Controller
Completed: July 14th 2017
Other Projects:
- Beatmania IIDX Controller, with CAD files to make the box look amazing
- IIDX - SDVX Hybrid Controller (incomplete)
- Soundvoltex Controller (normal size)
- Soundvoltex Mini controller
Index
- Details
- Variations
- Code and CAD files
- Parts List
- Button layout
- Asembly / Building the controller
- Gallery
- Troubleshooting
Details
This guide is all about making a simple and small arcade controller. The quality of the controller depends mostly on the brand of the parts you choose to buy, so ou can go the cheap route with chinese ball top arcade parts or go full japanese with SANWA’s.
The abridged tl;dr version of this guide is:
- Buy the complete arcade kit from china or SANWA
- Buy wood and stuff to make a box
- Make the needed holes for each button and stick
- Paint or cover the box with vinyl or leather
- Mount the buttons and stick
- Play the heck of Metal Slug and Street Fighter II
Next!
Variations
There’s no code or variations of this controller. This is as simple as it gets.
Diferent controller layout can be found on www.slagcoin.com/joystick.html
Code and CAD files
Forget about uploading codes or messing with Arduino IDE. Chinese arcade PCB’s are cheap and come with every button pre-configured ready to plug and play. It’ll even work on PS3.
But if you want to use a Arduino anyway, Arduino IDE comes prepackaged with some controller codes for you!
Part List
This is everything you’ll need.
For the box:
- 3mm laser cut clear acrylic (TOTALLY OPTIONAL)
- 4 M5 metric bolts and nuts to mount the acrylic (OPTIONAL TOO)
- 4 magnetic locks (Optional)
- 9mm MDF wood for the main part of the box.
- 3mm MDF wood for the back door (it can also be 9mm if you want it to be sturdier.)
- Sandpaper (180 and 100 grit) to smooth the corners and holes made for the buttons. For that nice finish yo!
- Wood glue and some small nails.
-
Spray paint (Rustoleum is good), vinyl (3M 1080 carbon fiber is good), Printed vinyl (for that arcade feel), or whatever you feel like using.
I’m being serious here, go crazy with your controller, paint it or use vinyl and it’ll look good in the end.
Tools:
- Drill
- Dremel (Optional)
- Power Sander (Optional)
- Jigsaw (Optional a Table saw or Miter saw)
Drill Accesories:
- 30 to 32mm Spade, hole saw or forstner drill bit.
- 25mm Spade, hole saw or forstner drill bit. (Optional, only if you buy 25mm buttons) This is to make the button holes!
Controller set:
- 1pc. Arcade Stick (Ball Top)
- 8pcs. 30mm Arcade button
- 2pcs. 25mm Arcade button (You can also use other 2pcs. of 30mm button)
- 10 - 14 male header to crimp connector wire. (Comes with the chinese arcade set)
- USB Encoder PCB (this comes from China too)
You can buy the complete set from china or Ebay and it will include all of the above at like $40. That’s the cheapest option and it’ll work. But you can also buy SANWA parts which will be $50 without the USB encoder PCB which will be an extra $15. I’ll leave the links below.
Details on the controller set: Okay, here I’ll try to explain some of the options you have for this. Most of the info comes from http://www.slagcoin.com/joystick.html so be sure to check the original source for more details.
Arcade Stick Here we have 3 options:
- Chinese stick (comes with the complete arcade set) it’s a copy of the SANWA Ball Top model JLF.
- SANWA’s JLF-TP-8YT Ball top
- HAPP IL competition joystick
Ball top are the usual japanese arcade stick, meanwhile HAPP inverted tea drop stick is the one used in most US arcades before the ball top arrived. I’d say go for the SANWA’s, it’s miles better than the chinese and it’s just perfect. On the other hand HAPP sticks are nostalgic but too stiff for a fightstick.
Buttons
- Chinese buttons are bad, difficult to press, tiring if you’re playing shmups or Metal Slug.
- SANWAS are good, really good, not cheap but good. Comes in many colors.
- SEIMITSU’s are also really good. You can’t go wrong with either one (except chinese).
USB encoder PCB This is where all the buttons are connected. You have multiple kinds of PCB’s from many companies and the expensive ones are really good, but this time I’d say go cheap. These custom PCB’s can go as high as a $100 each and the chinese cheap ones will do just fine for $10. The chinese USB encoders also work on PS3 and maybe PS4 so there’s that. Also they’re cheap.
Go with the cheap one.
Okay, so I’ll present you 2 options. You’ll decide which one is for you (SANWA is for you!) and you’ll be as happy as me with my controller:
Option 1:
- Buy the full Chinese Arcade set for $30-40 and you’re good to go. No hasles, or soldering, or choosing what’s best. (Now onto Option 2!)
Option 2:
- 1pc. SANWA JLF Ball Top arcade stick.
- 10pcs. SANWA 30mm buttons (or 8pcs. + 2pcs. 25mm buttons)
- 1pc. Chinese USB encoders with wires included.
###Links to everything (except tools and skills)
Super chinese complete arcade set SUPER CHEAP edition
Includes the cheap stick, cheap buttons, USB encoder and wires. (For real!)
PCB (Standalone)
If you need other options check this part of this guide: http://www.slagcoin.com/joystick/pcb_wiring.html#CUSTOM_PCBS
Arcade Stick
Buttons
There’s also a silent version of this button named OBSF-S that includes a smal foam ring inside the button to make less noise. I don’t recomend it though, I don’t like the tactile feeling IMO.
If you search for the same model on other stores (Amazon ,Ebay, Aliexpress) you can find them there too, I’m just too lazy to put all the links right now.
Button and Stick LAYOUT
You can find many layouts here:
http://www.slagcoin.com/joystick/layout.html
For my controller I used this one:
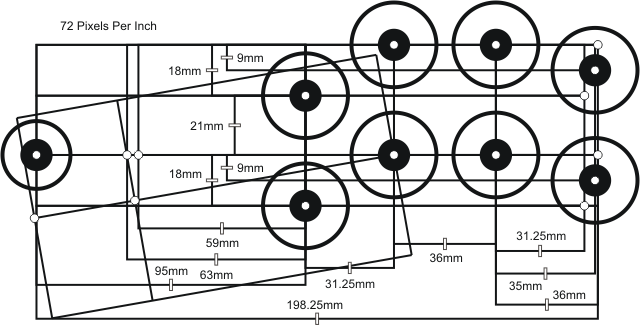
It’ll fit just about right in a 30x20cm box. You can also choose to move the stick closer to the buttons (marked with the 59mm dot) but it’s up to your liking.
As Slagcoin would say:
Print diferent layouts at scale and put your hands over them to see if they’re comfortable enough, and see how much space your hands need for every movement
As an example, I left one entire half of the controller for the stick, because that way I can rest my hand on the controller.
Assembly / Building the controller
Start by cutting the box and making the holes for the buttons.
The box is really simple, but you can make it bigger if you like, meanwhile here’s what I did:

I made the entire controller from a 40x40cm piece of 9mm MDF wood. The buttons and arcade stick don’t need much room inside so a 5cm height controller will do just fine. (You can even make it 4cm)
I started by cutting the 4 walls and the main top part with a jigsaw.
Then I did the holes with a drill and a 32mm hole saw for each button, and a 20mm (3/4”) spade drill bit for the controller stick. I recommend doing the holes at this point so the rest of the walls don’t bother you so much.
Using the metal plate that came with the stick I marked the position of the 4 main bolts that’ll fix the stick in place. If you’re using acrylic then you’ll need to have these holes made in the laser cutting part (which I won’t detail here, sorry!)
IF you want to, you can put a 3mm clear acrylic on top of the box to use whatever piece of art in between the acrylic and the box.
Remember to do the holes for the START and SELECT buttons. A 25mm hole if you’re using 24mm buttons or a 32mm hole if they’re 30mm buttons. In my design I made them on the side (for that extra cool factor).
After making each one of the holes, sand the surface a little bit with a 180 grit sandpaper and proceed to the next part.
Glueing
Turn the main plate upside down with the face pointing down, and then glue the 4 walls to the top part one by one. I recommned glueing one of the walls first and letting it dry for and hour or two, and the use that wall to support the next one.
After the glue dries use a 100 grit sandpaper to smooth the rough areas and then 180 grit sandpaper to make it softer and smoother.
(Picture of finished wood box)
Yu can see I made the front and back cornes rounder with some sand paper, and also sanded each one of the faces of the controller (this’ll help when painting or adding the vinyl to the surface).
I left the buttons holes without sanding so the plastic buttons have something to grab onto.
Finishing
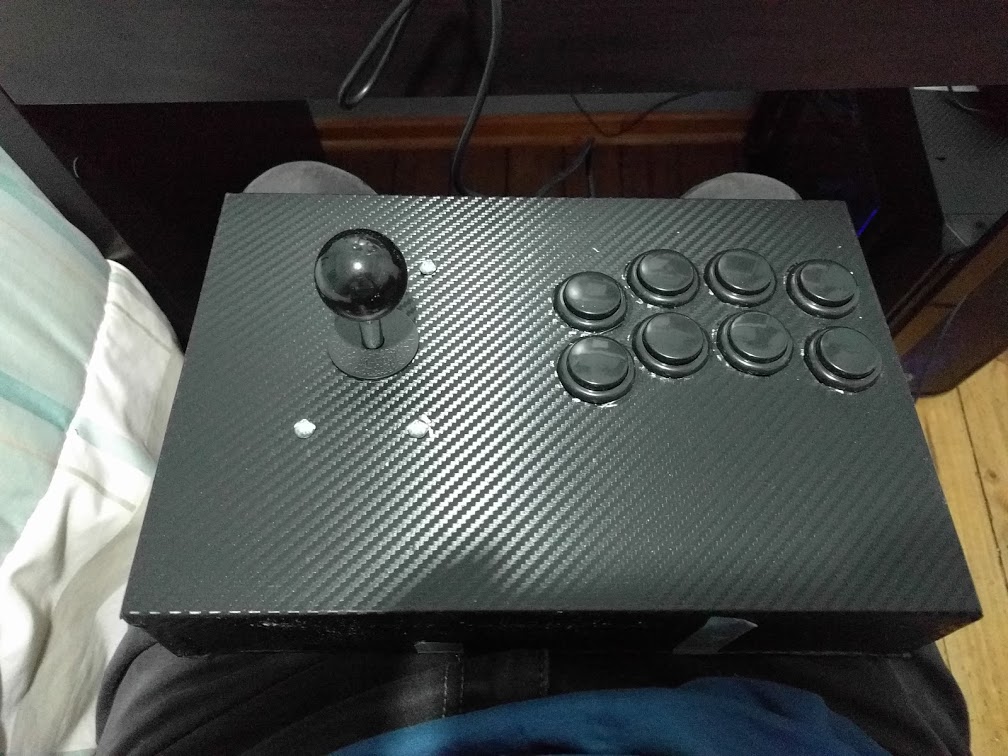
When the controller’s body is done you can do whatever you want to finish it. What I did was use some 3M carbon fiber 1080 vinyl a friend gave me and covered the entired controller with it.
I stated drawing the shape of the controller on the back of the vinyl with a ruler and then I precut everything. Then I removed the protective layer of the vinyl for the back part of the controller and started glueing it slowly front the back to the front, that way there won’t be any visible joints.
After that I cut a 30x20 3mm MDF I had and used vinyl on that too, and that’s the back door for my controller.
After that you can put the 4 magnetic locks to attach the door or simply use 4 screws to keep the door in place.
Wiring and stuff

I started by putting each button in its place and the controller stick too from the inside of the controller. Using 4 nuts I attached the controller metal plate to the controller and that’s it.
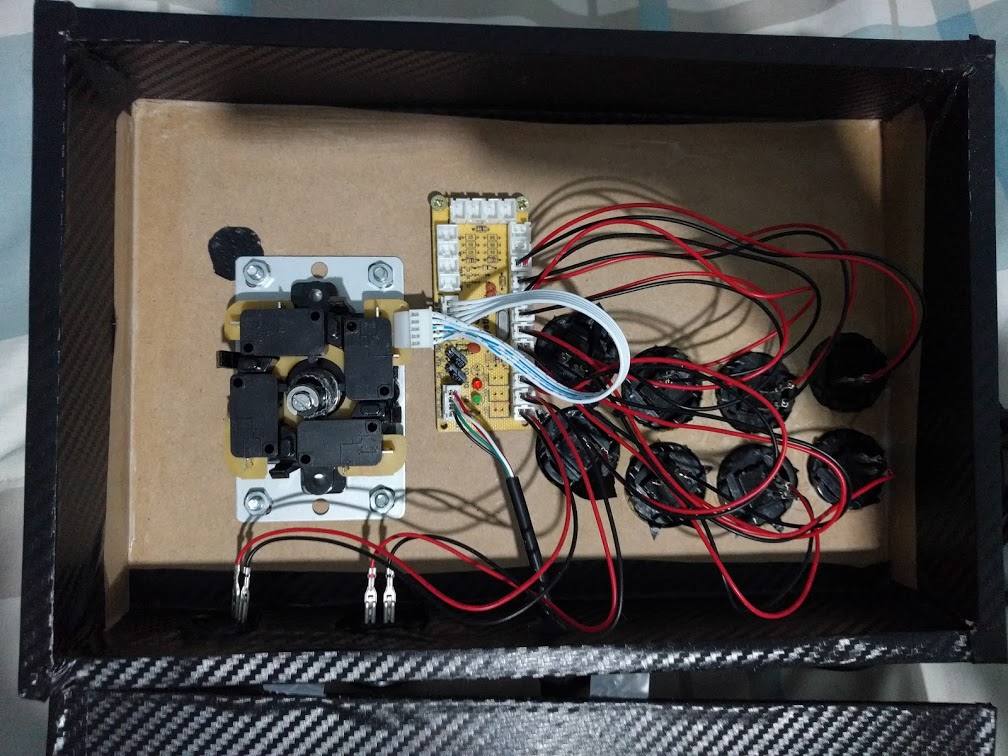
I used some small screws to keep the USB encoder in place inside the box, and started wiring everything up.
If you bought the cheap arcade set you’ll have at least 12 crimped wires with headers. Just attach the red and black wire to each button, and the 5 pin wire from the controller stick to the board and you’re done. Plug each button in whatever order you like (I pluged them from the top row (1, 2, 3 and 4) and then the bottom row (5, 6, 7 and 8) and then the START and SELECT button on 9 and 10)
You can also add an extra small button to the MODE pin to change the stick behavior from analog to digital POV. Some emulators or games might not recognize one or the other so the USB encoder gives you the chance to change between them. What I did was add that extra button and kept it inside just in case.
Gallery
Send me pictures of your controller on Discord and I’ll post them here!
OTHER CONTROLLERS made by you guys and gals
Other controllers made by YOU
Troubleshooting
Any questions, troubleshooting or tips? Try my Discord server:
Donations
I give these guides free of charge for everyone to share and use, so you don’t need to pay a cent to have this information in your hands. I also give support on my Discord server if you need any help.
BUT if you feel like giving me a beer for my hard work collecting this information you can do it here: